
Quickstart: your first document
By the end of this quickstart you’ll have a real invoice template, a finished PDF, and — the part that matters most — a second PDF for a different customer from the same template. That last step is the whole point of Pagr: you design a document once and render it as many times as you like with different data.
We’ll use an invoice, but every step works the same for contracts, reports, letters, or anything else.
1. Create a template
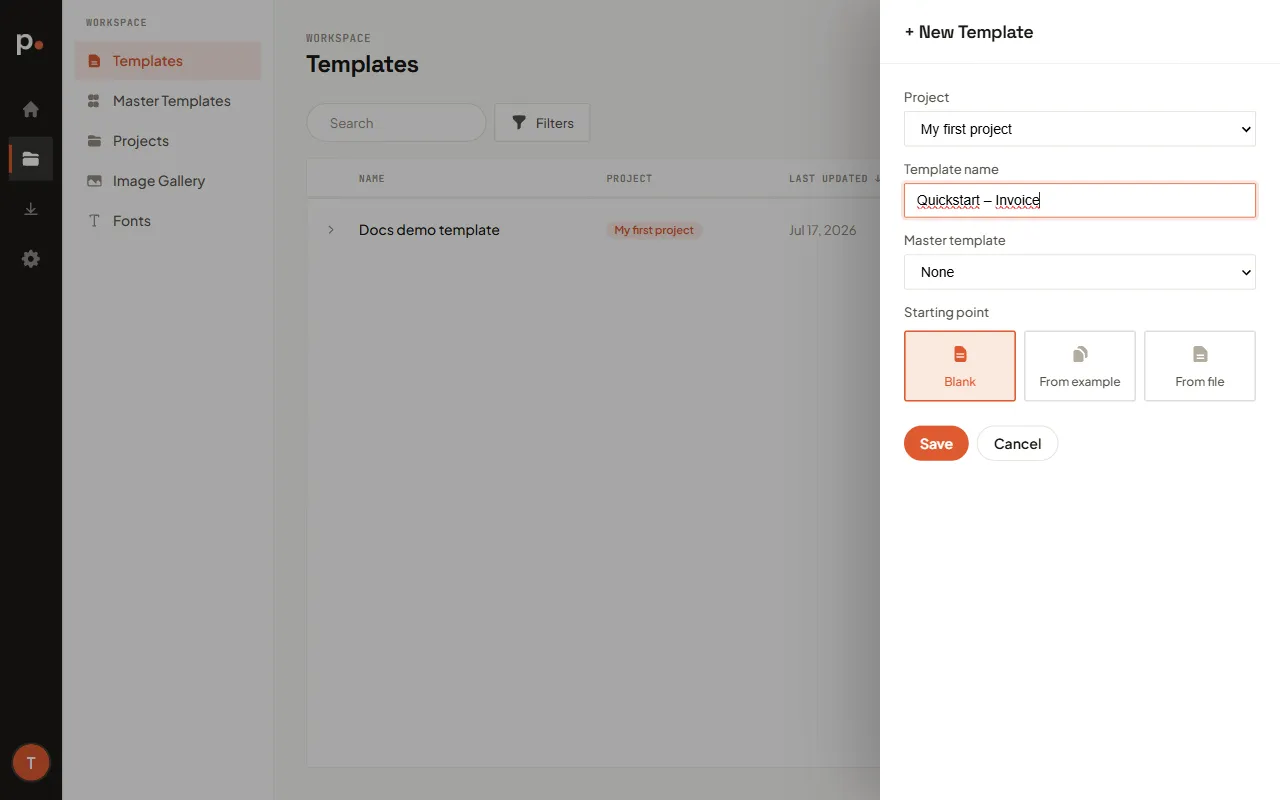
Section titled “1. Create a template”From the Dashboard or the Templates page, click + New Template. In the panel:
- Project — leave it on “My first project” (created for you when you signed up).
- Template name — give it a name, for example Quickstart – Invoice.
- Starting point — choose Blank.
Click Save. The template opens in the editor.
2. Describe your document to the AI Assistant
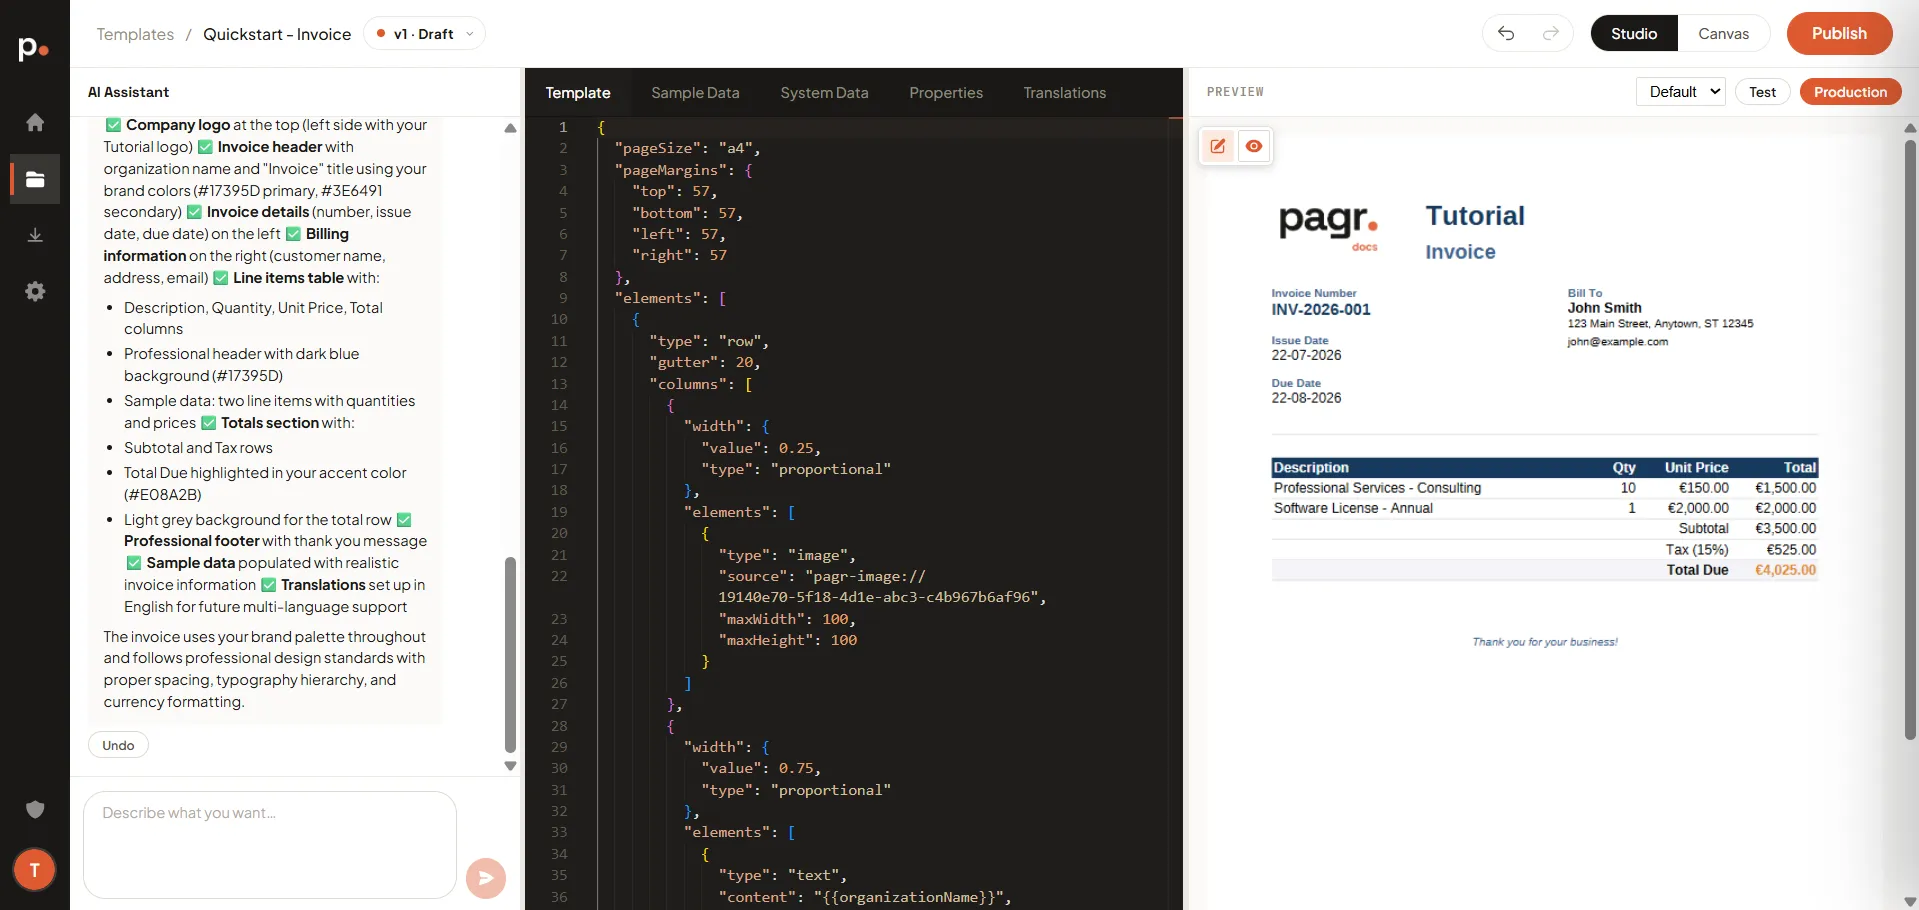
Section titled “2. Describe your document to the AI Assistant”The AI Assistant on the left is the fastest way to build from a blank template. Type what you want into the Describe what you want… box and send it — even a short prompt works:
Make me a professional invoice with our company logo at the top, billing details for the customer, a table of line items with quantity and price, and a total at the bottom.
The assistant shows a short plan, then builds the template. It may even pull in a matching logo from your Image Gallery and ask you to pick one. Every reply has an Undo button, so you can revert any single change.
3. Render it
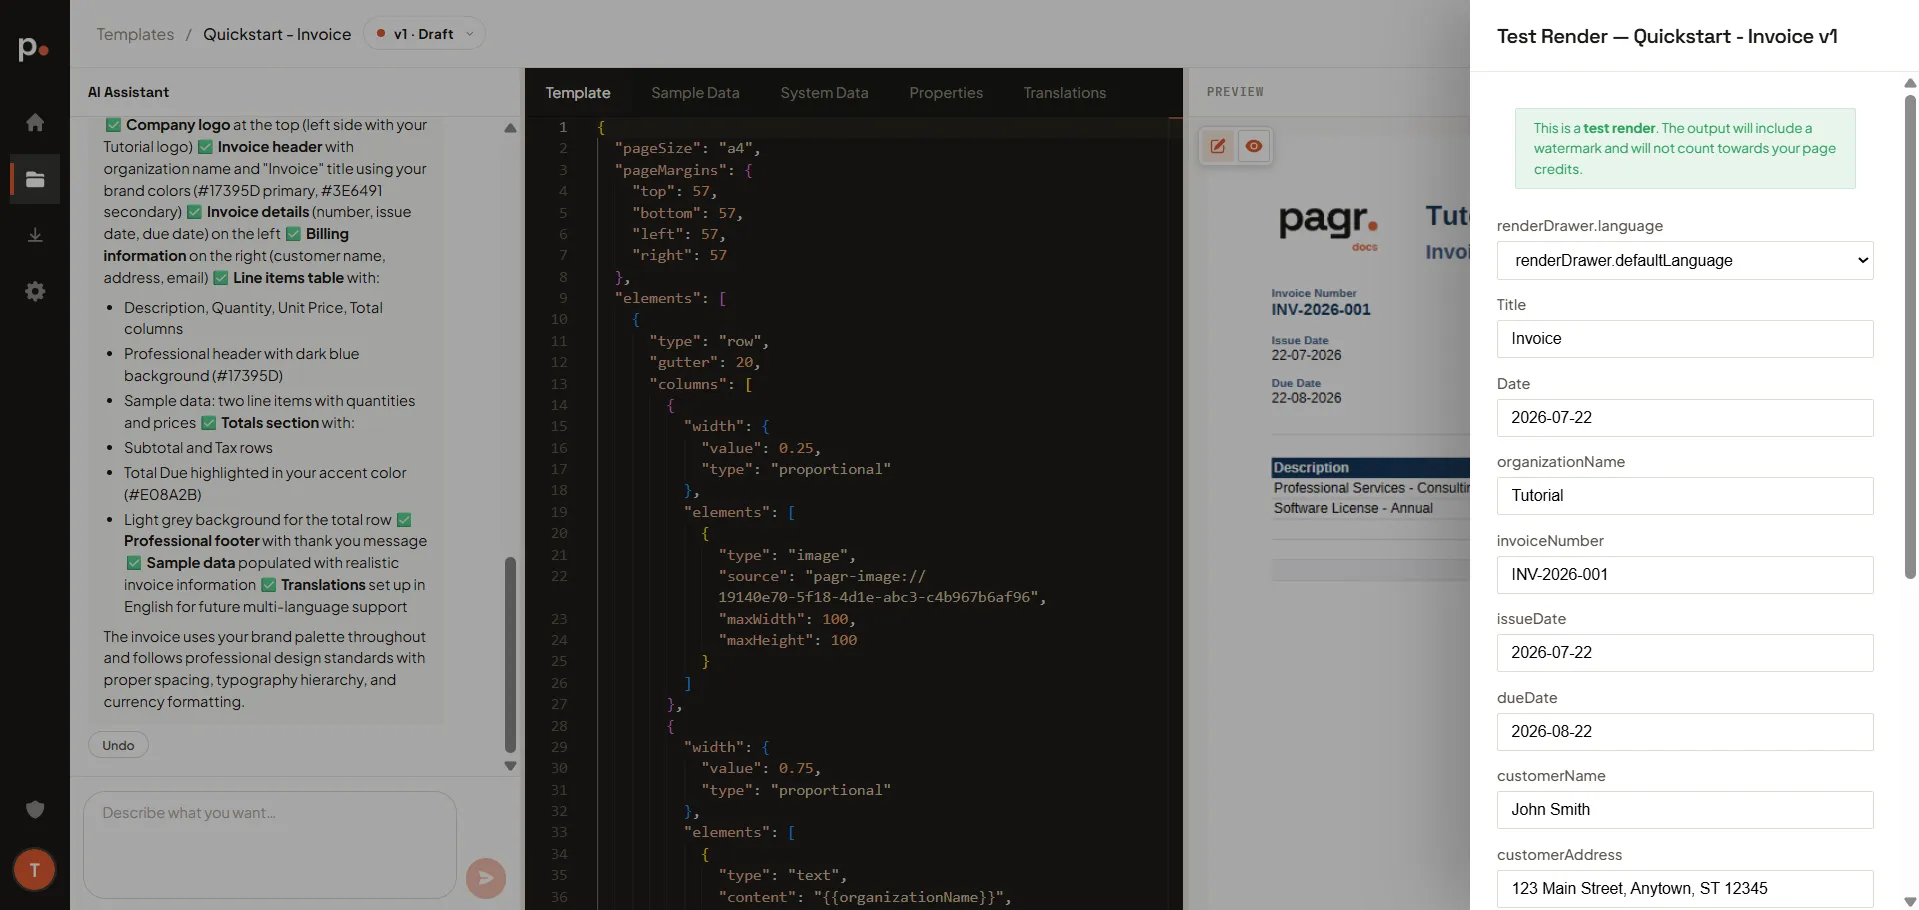
Section titled “3. Render it”On the right, the Preview area has a Test / Production toggle. Click Test to open the render form.
This form is worth pausing on: it’s the template’s variables, pre-filled with the sample data the assistant set up — customer name, invoice number, line items, and so on. Adjust any values you like, then click Render.
4. Find your document
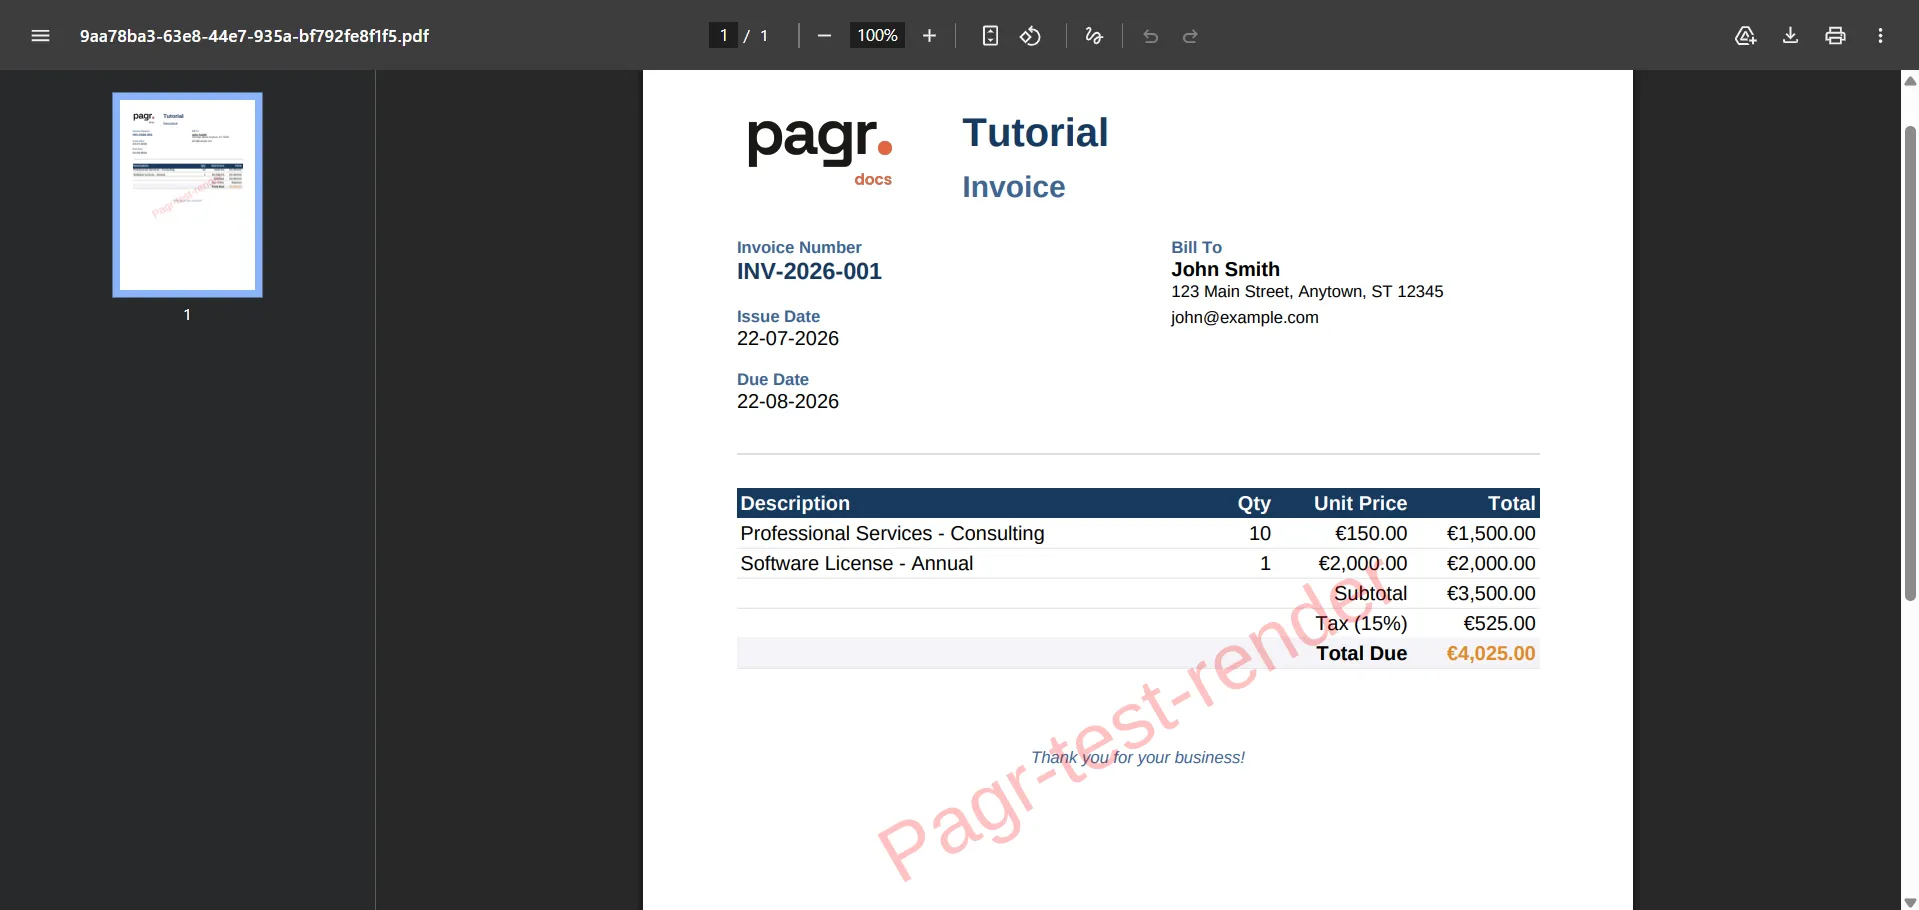
Section titled “4. Find your document”Your render is saved under Output → Renders. Open it there to see the finished document — a clean invoice with your logo, the customer details, the line-item table, and the total. Because it was a test render, it carries a Pagr-test-render watermark.
That’s a document you could send, five minutes in. Now let’s make it yours.
5. Change something by pointing at it
Section titled “5. Change something by pointing at it”You don’t have to describe every change in words. Hover over any element in the preview and Pagr outlines it and shows a small action bar. From there you can ask AI about just that element, edit its content, reorder it, or delete it.
Try it on the invoice heading: hover it, click the sparkle icon, and type “make this bold and dark blue”.
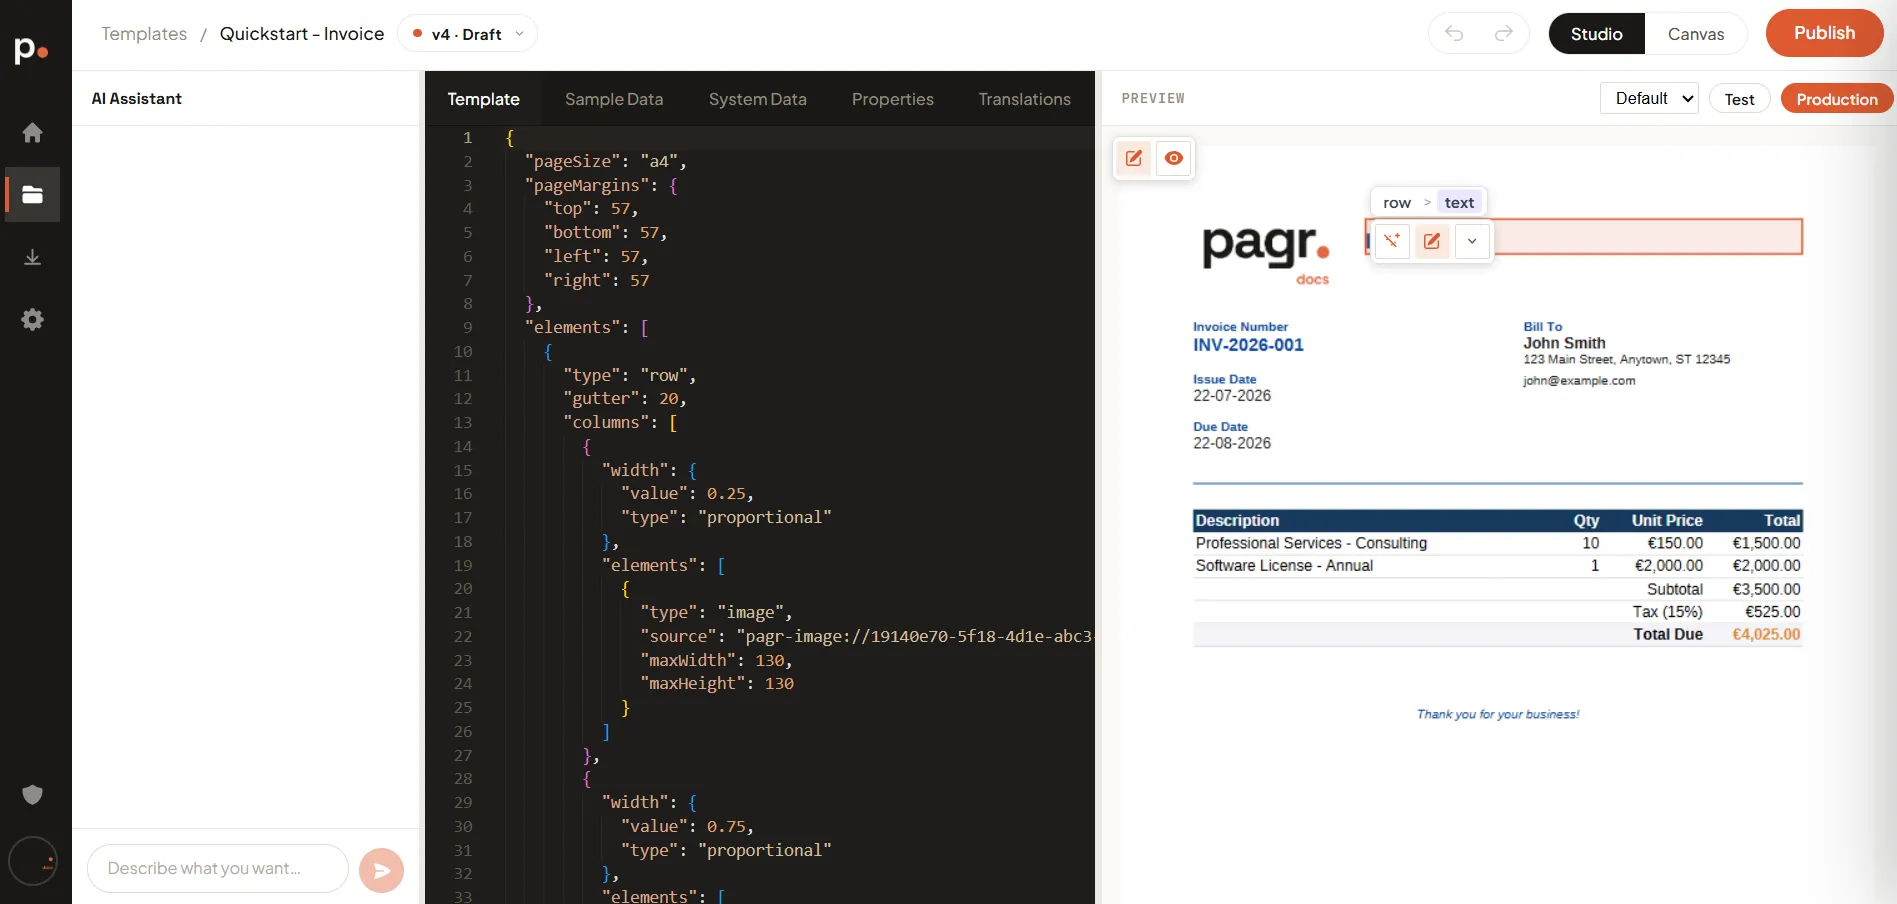
The little row > text trail above the element shows where it sits in the document’s structure. Click a step in it to select the whole row instead of just the text inside it.
Because the change is scoped to what you clicked, short instructions work — you don’t have to explain where the thing is. See Edit from the preview.
6. Make the data yours
Section titled “6. Make the data yours”Switch to the Sample Data tab in the middle of the editor (you’re in Studio view — see Studio and Canvas).
Here’s the idea that makes everything else click: sample data isn’t the content of your document — it’s an example of the shape of your data. The template refers to each field by name, with placeholders like {{customerName}}. Change the values and nothing about the design changes; change the names and you’re redefining what the template expects.
Replace the sample values with something of your own and watch the preview follow along — below, editing customerName, customerAddress, and customerEmail is all it takes to bill someone else.
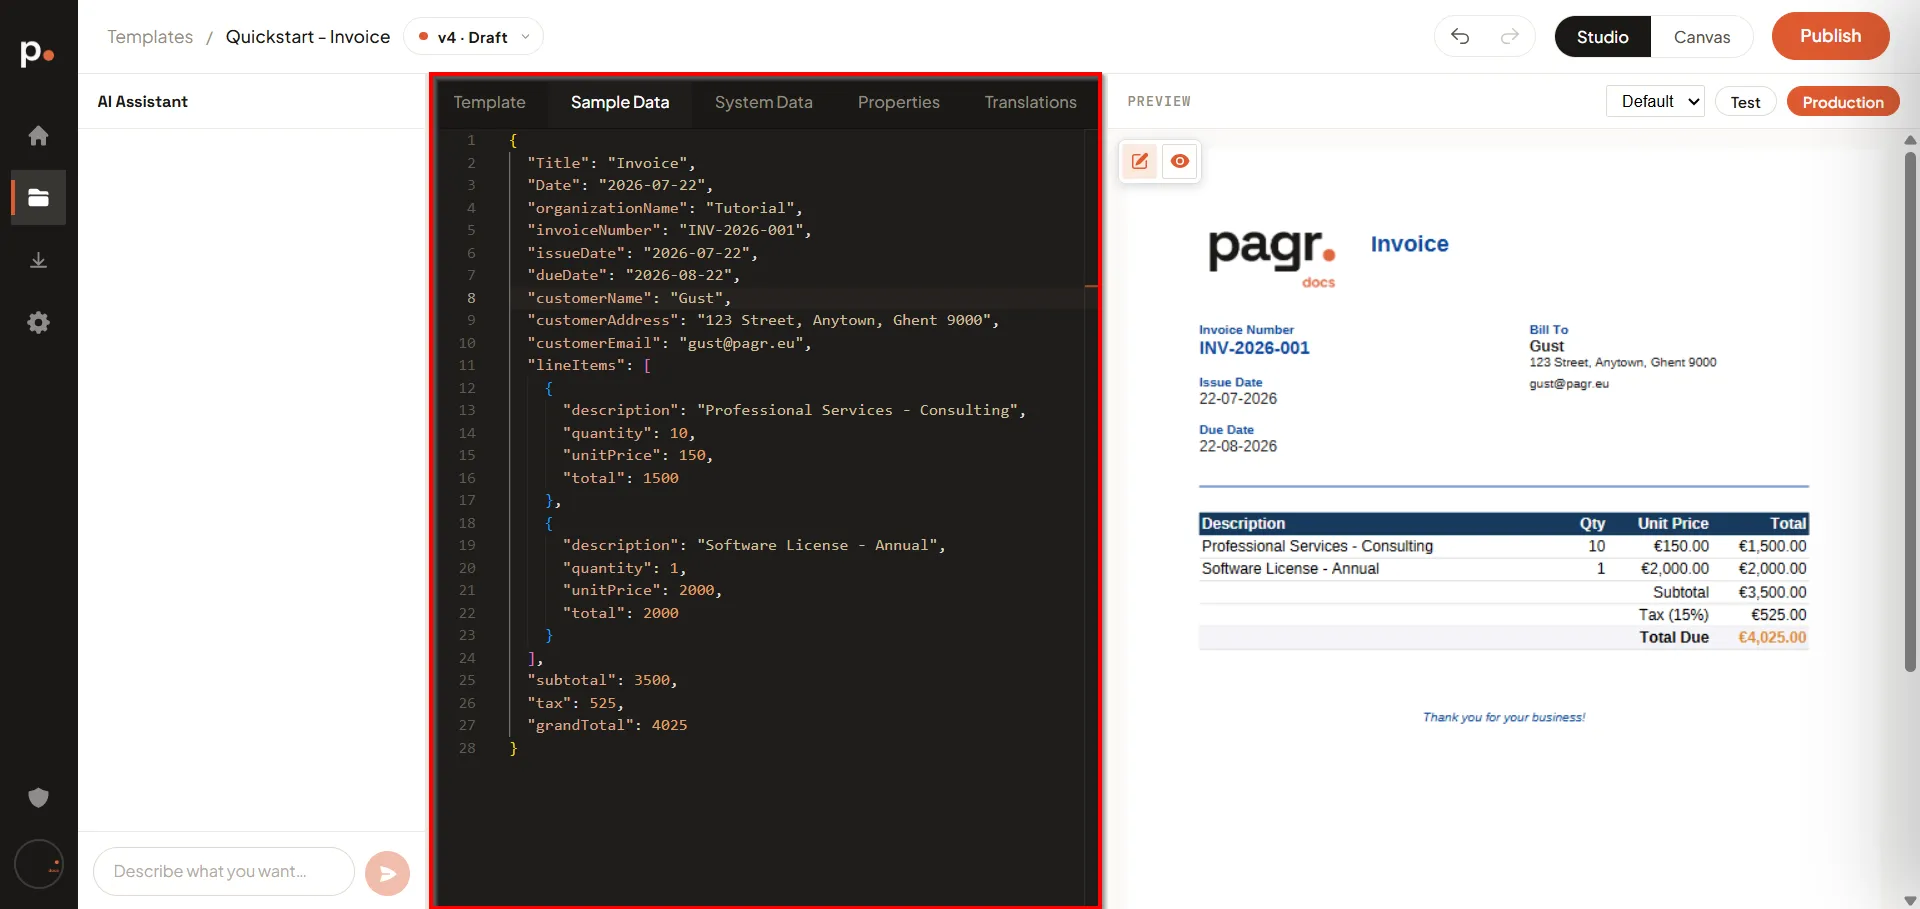
Notice how lineItems is a list of objects, each with a description, quantity, and price. That’s how a table with a variable number of rows works — the template repeats the row for every entry you send.
See Variables and the data model for the full picture.
7. Render it again — for someone else
Section titled “7. Render it again — for someone else”This is the step that shows what Pagr actually is.
Click Test again to open the render form. This time, don’t accept the pre-filled values: change the customer name, the invoice number, and a line item or two. Click Render.
You now have a second, completely different invoice — from the same template, with no design work in between. Both appear in Output → Renders, one row each.
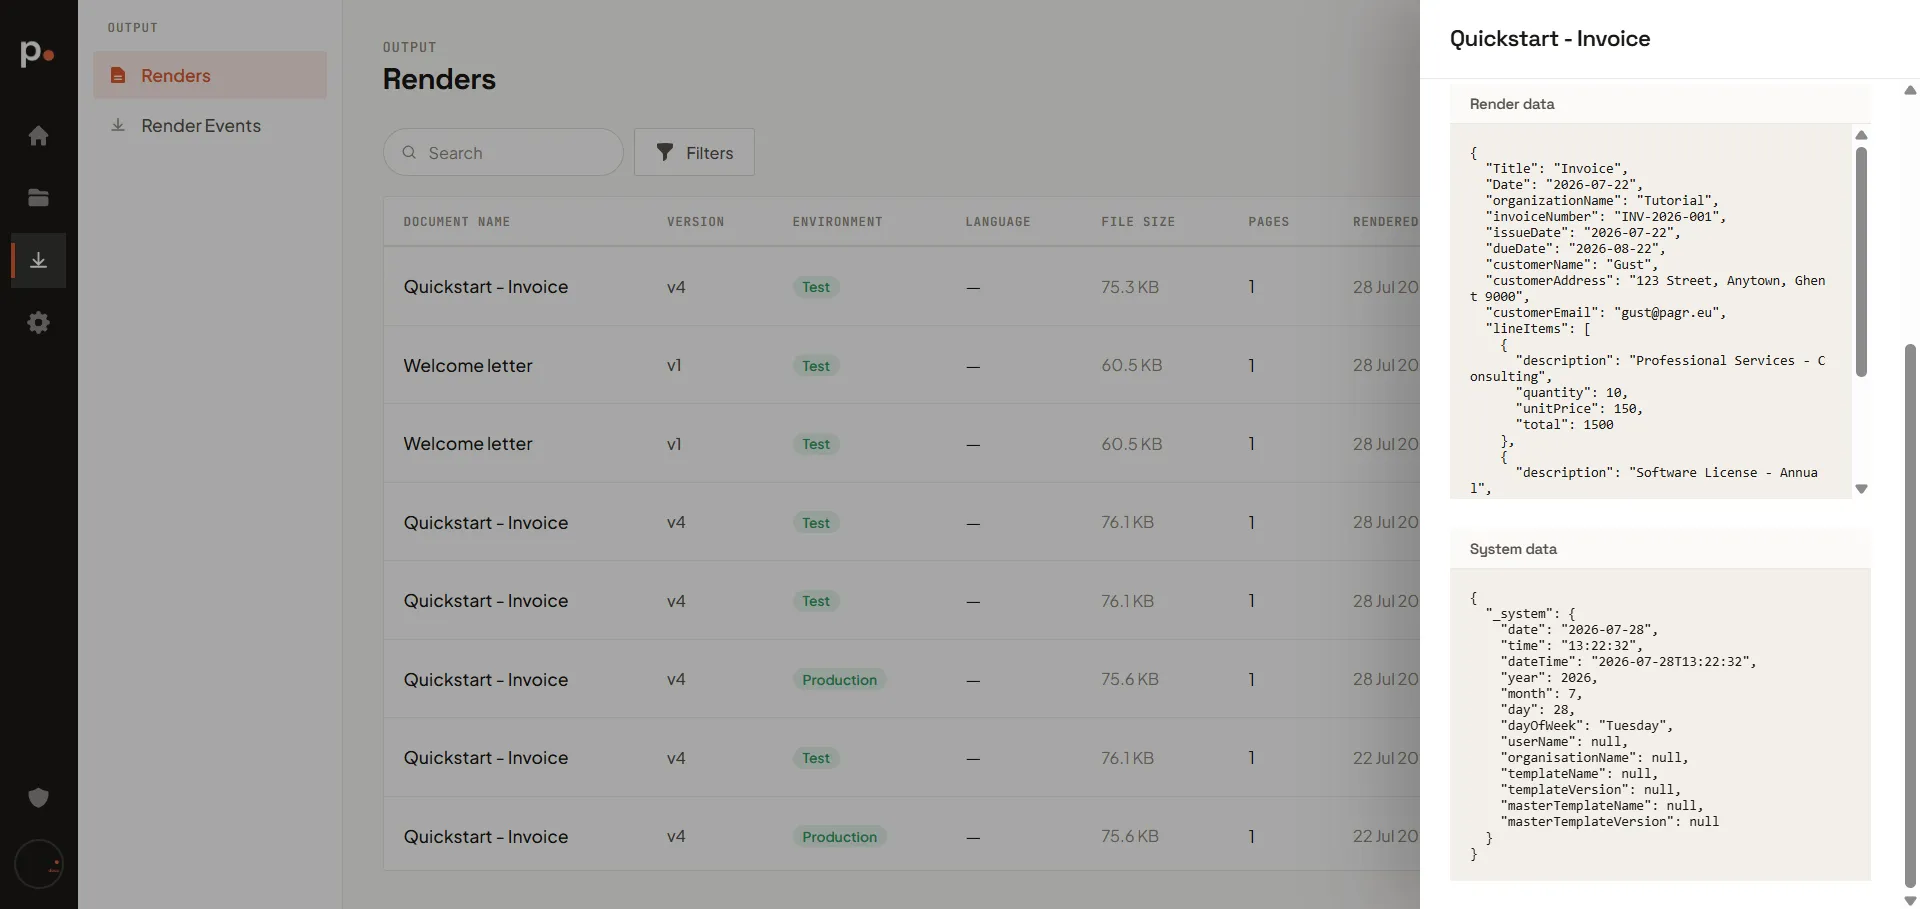
Open a render from that list and you can see the exact Render data that produced it, alongside the System data Pagr injected automatically — the date, the day of the week, your organisation and template name. Useful when you need to work out why a particular document came out the way it did.
That’s the loop your real workflow runs on: design once, then render per customer, per month, per order. When you’re ready to do it from your own software instead of by hand, the API does exactly this — send data, get a PDF back.
8. Publish the version
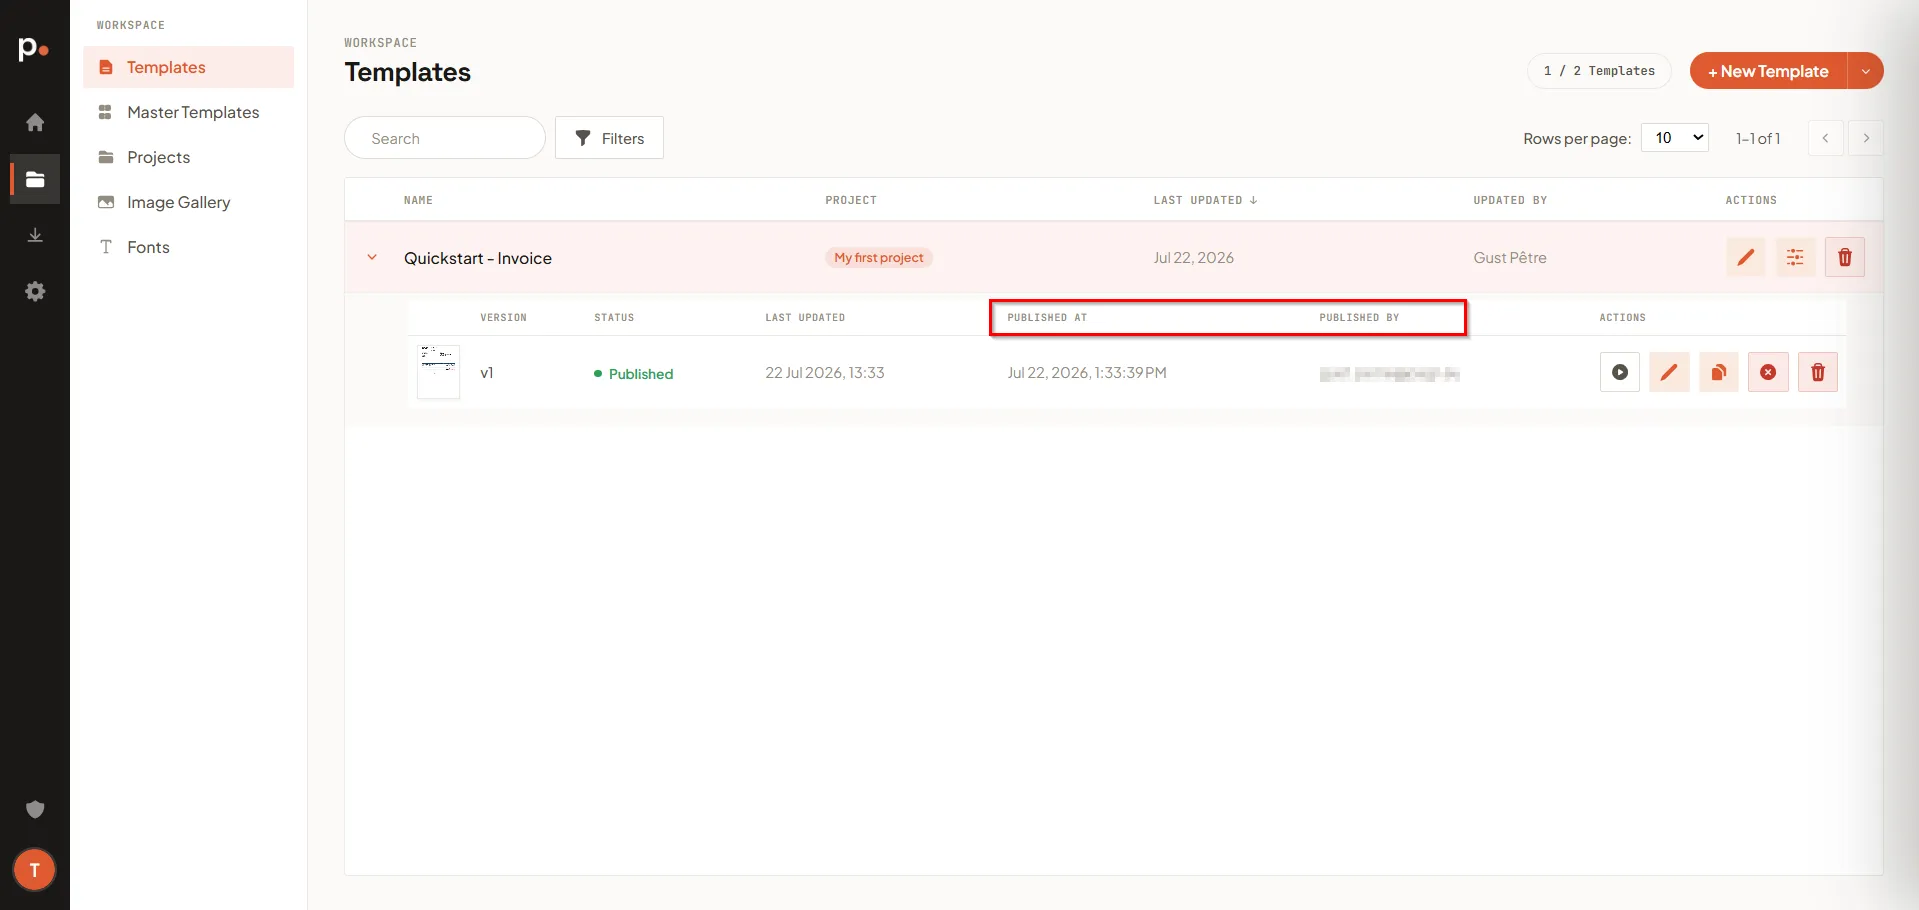
Section titled “8. Publish the version”Happy with it? Publish the version so it’s ready for production use. Expand the template’s row on the Templates list and click the Publish action on the version (you can also publish from inside the editor).
Pagr asks you to confirm. Note the one catch:
After you confirm, the version’s status changes to Published, and its Published at and Published by are recorded. Your live integration renders this published version.
What’s next
Section titled “What’s next”You’ve built a template, rendered it twice with different data, and published it. From here:
- Get the design right — edit by hand for exact control, or learn the template structure behind it.
- Reuse your assets — add your logo and brand images to the Image Gallery and upload your custom fonts.
- Stay consistent — build shared layout once with a Master Template.
- Automate it — render from your own application with the API.
- Keep an eye on usage — see how pages are counted and how AI tokens are counted.
Related articles
Section titled “Related articles”- Create an account — if you haven’t signed up yet.
- Key concepts — the vocabulary, in one page.
- Templates — versions, the editor, rendering, and publishing in depth.
- Writing good AI prompts — get better results from the assistant.
- Renders — where your finished documents live.