
Editing a template by hand
The AI Assistant is one way to build a template — but it isn’t the only one. Everything the assistant does, you can also do yourself. This page covers the editor’s manual controls: the two editor views, the tabs that define the template and its data, and the page-setup form.
You can mix both approaches freely: ask the assistant for a first draft, then fine-tune the details by hand — or build the whole thing yourself.
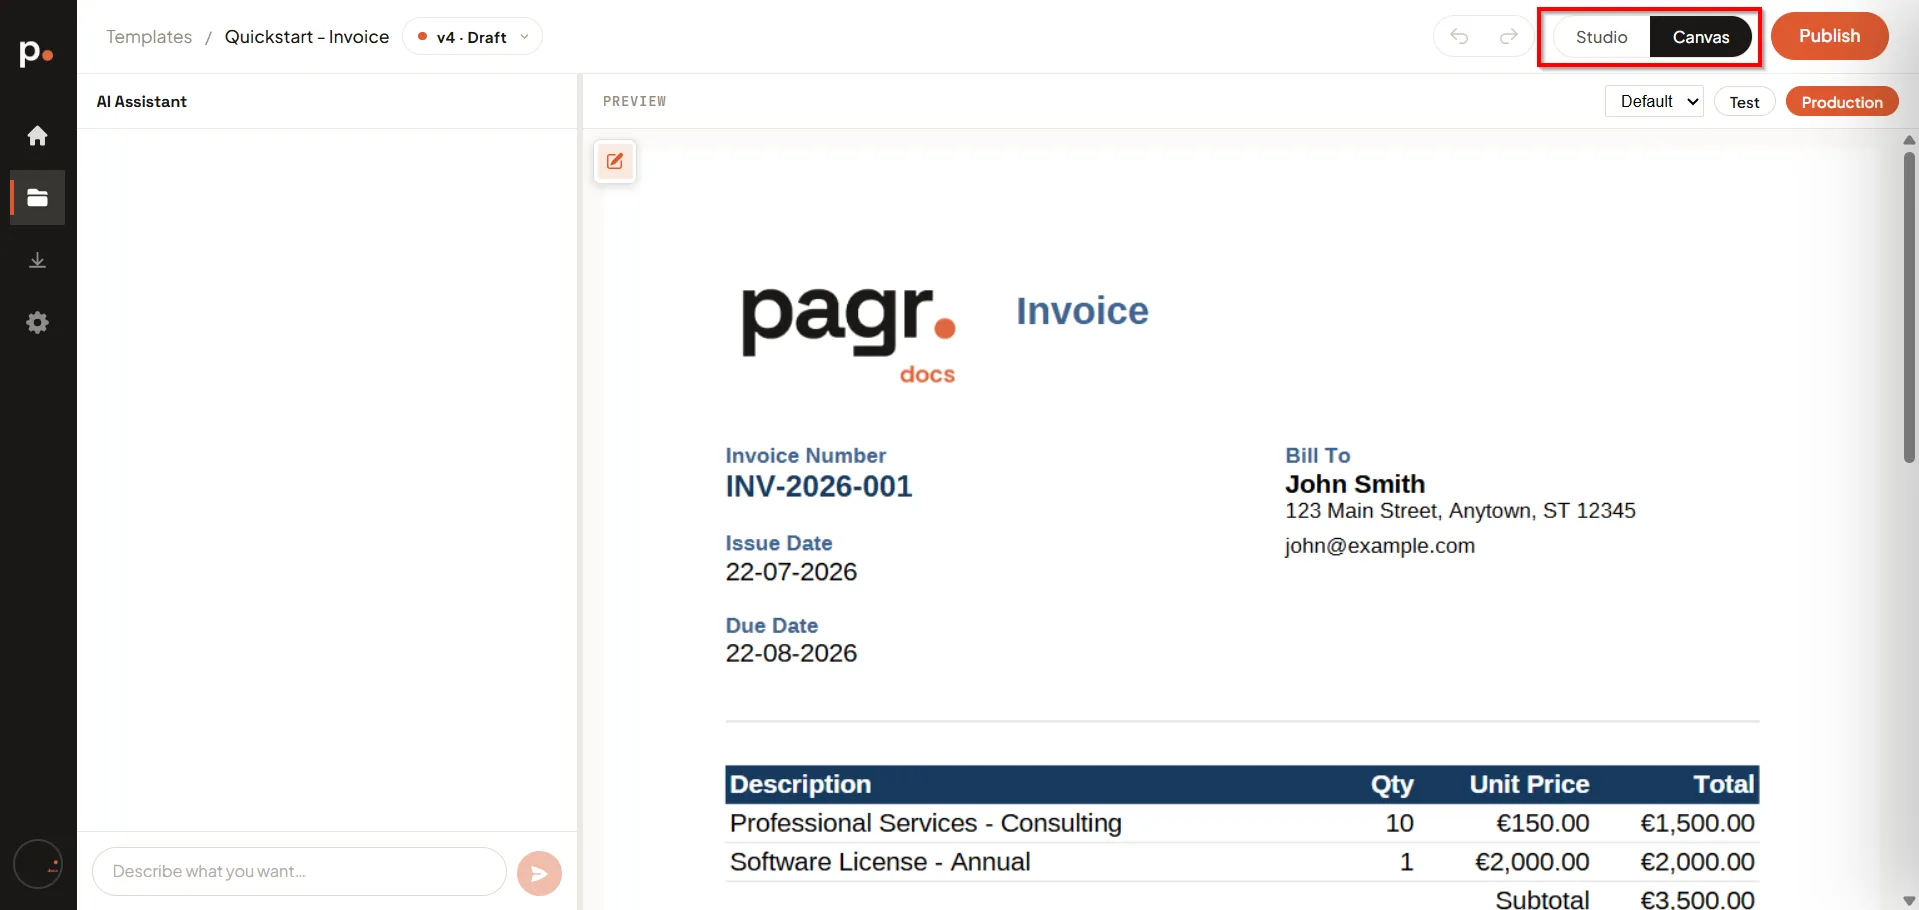
Studio and Canvas
Section titled “Studio and Canvas”The toggle at the top right switches the editor between two views:
- Canvas — the no-code view: the AI Assistant on the left and the live Preview on the right. You describe what you want and watch it appear, without ever seeing the template’s definition.
- Studio — the code view: the same assistant and preview, plus the editing tabs in the center. Four of those five tabs are JSON editors, so this is the view for working on the template by hand.
Everything on this page happens in Studio. Switch back to Canvas for a clean, full-width preview.
For a side-by-side comparison of exactly what each view shows and when to use which, see Studio and Canvas.
The editor tabs
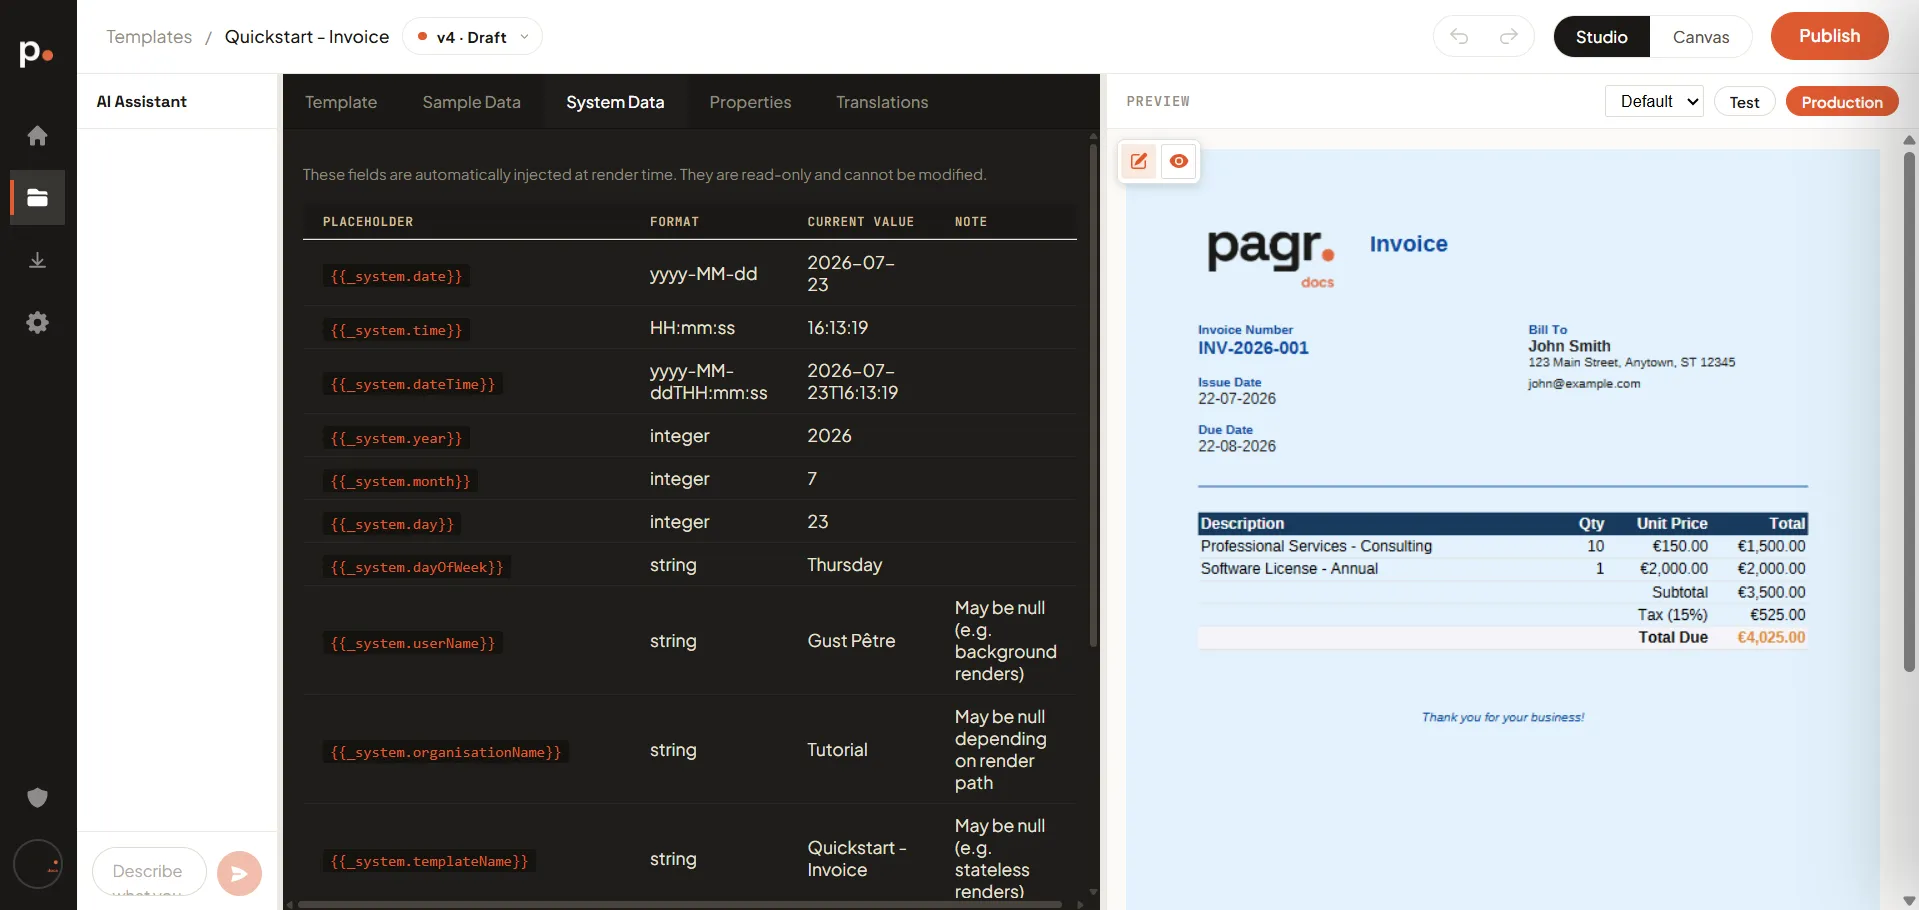
Section titled “The editor tabs”In Studio view the center panel has five tabs.
Template
Section titled “Template”The Template tab holds the template’s definition — the layout, styling, and content, expressed as a structured document. At the top you’ll find the page setup (pageSize, pageMargins) and then an elements list that lays the document out as rows and columns:
{ "pageSize": "a4", "pageMargins": { "top": 57, "bottom": 57, "left": 57, "right": 57 }, "elements": [ { "type": "row", "gutter": 20, "columns": [ { "width": { "value": 0.25, "type": "proportional" } } ] } ]}This is the same definition the AI Assistant writes to when you ask it for a change — editing it here just lets you do it directly. Use it to make a precise tweak the assistant keeps getting slightly wrong, to copy a block from one template into another, or simply to see exactly how the document is built.
For the full structure — every element type, the layout model, and the data-binding syntax — see Template structure.
Sample Data
Section titled “Sample Data”The Sample Data tab holds example values that fill the template’s variables when you preview or test-render — the invoice number, the line items, the totals, and so on. It’s plain JSON, so you can edit the values directly to see how the template behaves with different content. This JSON is the template’s data model — see Variables and the data model.
System Data
Section titled “System Data”The System Data tab is a read-only reference. These placeholders are injected automatically at render time — you don’t define them, you just use them in your template (for example {{_system.date}}). The tab lists every available placeholder with its format and current value:
| Placeholder | Format | Note |
|---|---|---|
{{_system.date}} |
yyyy-MM-dd |
|
{{_system.time}} |
HH:mm:ss |
|
{{_system.dateTime}} |
yyyy-MM-ddTHH:mm:ss |
|
{{_system.year}} |
integer | |
{{_system.month}} |
integer | |
{{_system.day}} |
integer | |
{{_system.dayOfWeek}} |
string | |
{{_system.userName}} |
string | May be null (e.g. background renders) |
{{_system.organisationName}} |
string | May be null depending on render path |
{{_system.templateName}} |
string | May be null depending on render path |
{{_system.templateVersion}} |
integer | May be null depending on render path |
{{_system.masterTemplateName}} |
string | Null when no master template is linked |
{{_system.masterTemplateVersion}} |
integer | Null when no master template is linked |
Properties
Section titled “Properties”The Properties tab sets the document name — the filename of the rendered output. Leave it empty to use the template’s name, or type {{ to pick a placeholder and build the name from the data — for example a name based on the invoice number so every rendered file is uniquely identifiable.
Translations
Section titled “Translations”The Translations tab holds translated strings so one template can render in more than one language. Strings are grouped by language code and referenced by key:
{ "en": { "invoice.title": "Invoice", "invoice.number": "Invoice Number", "invoice.dueDate": "Due Date" }}Add a language block and translate the keys, then use the language selector above the preview to render the template in that language.
You rarely have to write any of this by hand: ask the AI Assistant to translate the template and it writes the strings and points the elements at them. See Translations and languages.
Page setup
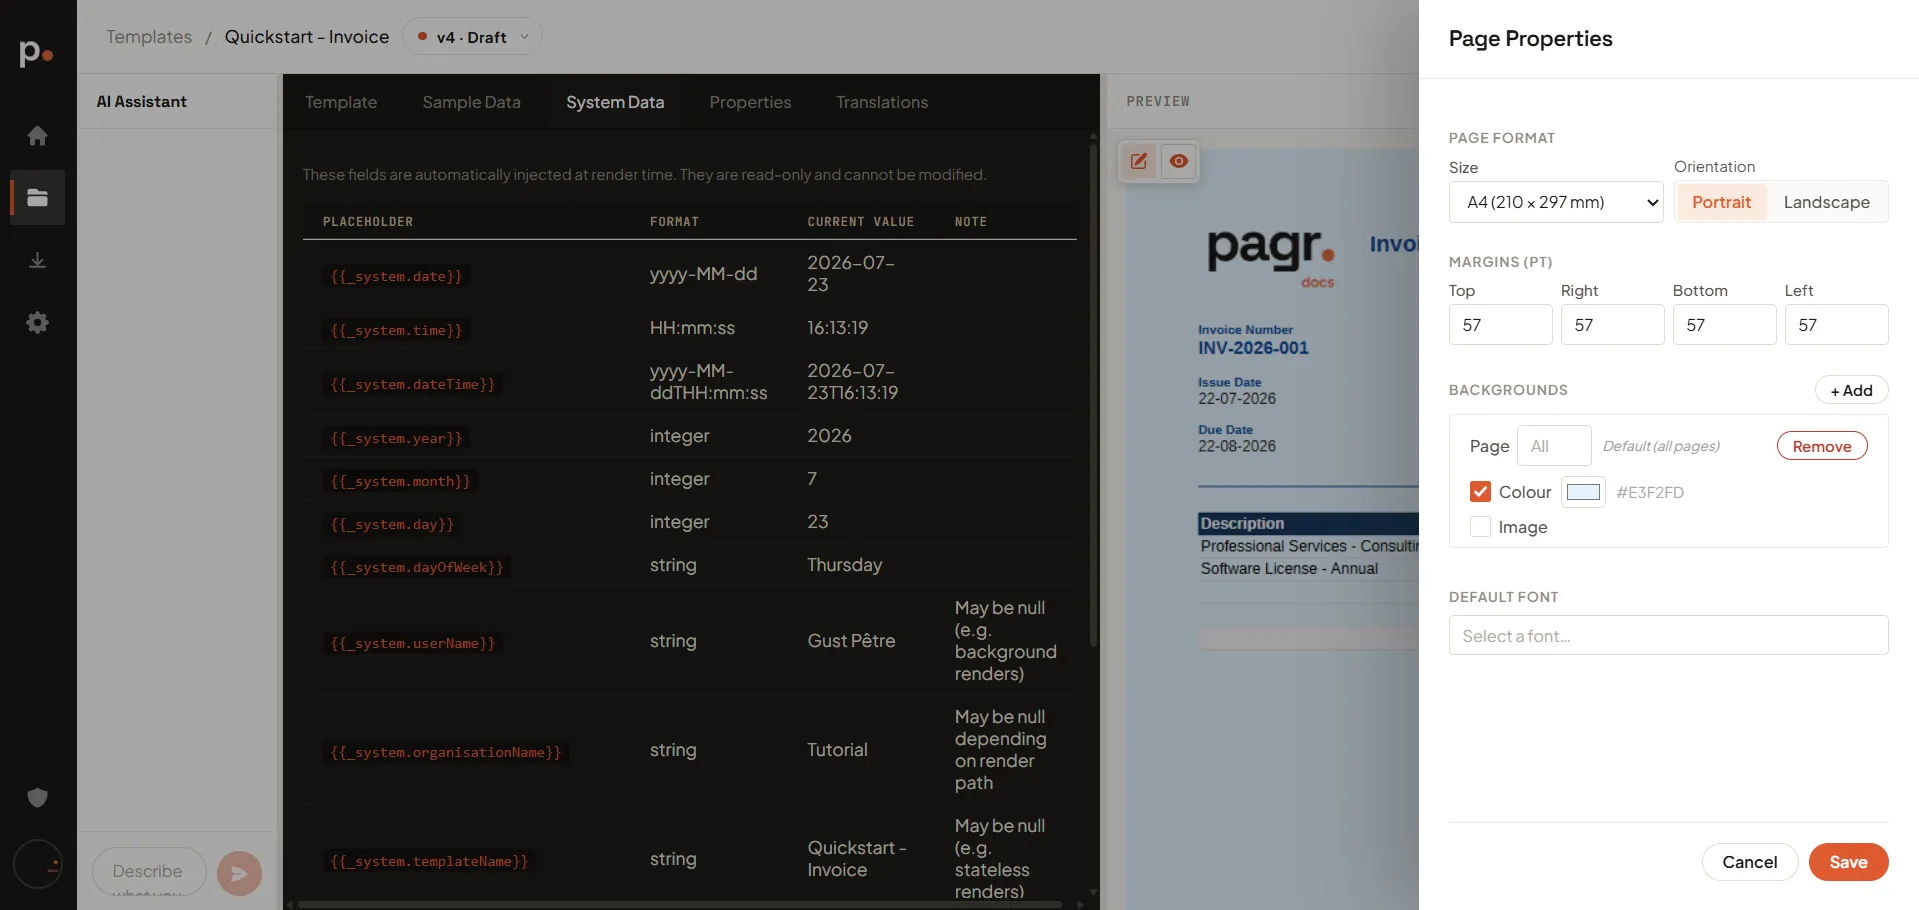
Section titled “Page setup”The pencil icon at the top of the Preview opens the Page Properties form — a visual way to set up the page without editing the Template JSON. It works in both Studio and Canvas view. From here you can set:
- Page format — Size (A4, Letter, Legal, or Custom) and Orientation (Portrait or Landscape).
- Margins — Top, Right, Bottom, and Left, in points (pt).
- Backgrounds — a background colour or image, applied to all pages or to a specific page.
- Default font — the font used where nothing more specific is set.
Click Save to apply, or Cancel to discard.
Check your work in the preview
Section titled “Check your work in the preview”Whatever you change, confirm it in the Preview on the right:
- Use the language / variant selector to preview a specific translation.
- Use the Test / Production toggle to render. A Test render is watermarked and doesn’t count toward your credits — use it while you design. See Rendering a template.
When the template looks right, use Publish in the top bar to publish the version — see Templates → Versions.
Related articles
Section titled “Related articles”- Template structure — the full reference for the Template tab’s JSON: structure, elements, and data expressions.
- Templates — versions, rendering, and publishing.
- Writing good AI prompts — build and change templates by describing what you want.
- Edit from the preview — change elements by pointing at them, no JSON required.
- Start from an example — skip the blank page with a ready-made template.
- Generate a template from a document of your own — start from an existing document.
- Generate a template from data — start from a spreadsheet or JSON file.
- Image Gallery and Fonts — reusable assets you can reference in a template.